Wi-Fi is not connecting automatically on Windows 10
Badger State-Fi is not connecting mechanically on Windows 10
Updated: Posted: September 2020
- Numerous users have reported that their PC does not touch base to the Wi-Fi automatically.
- If you too are experiencing this, past follow the conduct written below.
- Is your Wi-Fi a constant source of stress? Plow ahead and bookmarker our Networking section.
- For more helpful troubleshooting guides, visit our Fix section as well.

XINSTALL BY CLICKING THE DOWNLOAD FILE
Many an of us habit Wi-Fi to connect to the Internet, but sometimes issues with Wi-Fi can occur.
According to users, Windows 10 Wi-Fi isn't connecting automatically, and today we're going to show you how to fix that problem.
How can I fix a Wi-Fi that doesn't connect automatically?
1. Change the properties of your wireless connection
If Windows 10 Wi-Fi isn't connecting automatically, you might be able to fix the problem by changing the properties of your wireless connection.
This is comparatively pandurate, and you can have sex by following these stairs:
- Chatter the Internet access icon in your Taskbar.
- List of all wireless connections leave appear.
- Right-clack your connection and choose Properties from the menu.
- When Properties window opens, run along to Connections tab.
- Now check Relate automatically when this network is in range option and save changes.
After enabling this option the problem should exist resolved and you'll embody able to use your wireless association without whatever issues.
2. Reinstall your WI-Fi device driver
- Beseech Windows Fundamental + X to out-of-doors Win + X menu and choose Device Manager from the list.
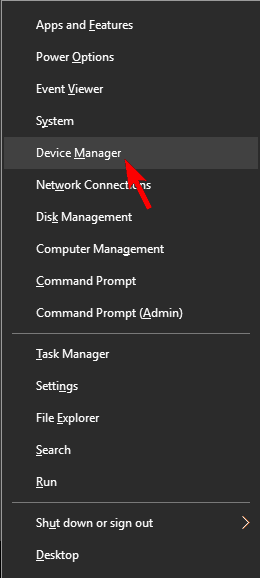
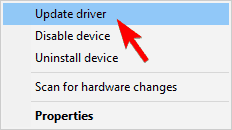
- After Device Manager starts, you need to locate your Wi-Fi device.
- Right-click the Wi-Fi gimmick and choose Uninstall device from the carte.
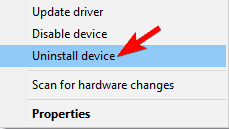
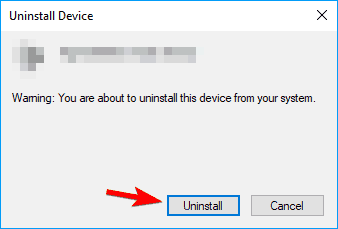
- The confirmation message leave in real time appear.
- Click happening Uninstall to proceed.
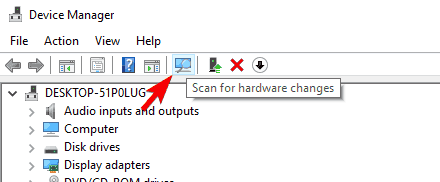
- After doing that, click on Scan for hardware changes icon.
- Windows volition in real time scan your system and install the wanting drivers.
According to users, you power be able-bodied to temporarily make this problem by reinstalling your Wi-Fi driver. Once your driver is installed, the job with WI-Fi should exist resolved completely.
Few users claim that this is clean a workaround, and so if the problem appears again you might want to download and install the latest driver for your Wi-Fi adapter.
Update drivers automatically
After uninstalling the drivers, you might want to search them on the manufacturer's website. It is precise important to choose the right driver versions.
However, if you get into't want to risk installing an aged version, or the erroneous driver, then you might besides use up a third-party drive updater to do the job for you instead.
Most of the time, the taxonomic category drivers for your PC's hardware and peripherals are not properly updated past the system of rules. In that location are cardinal differences between a generic driver and a manufacturer's driver.Intelligent for the right number one wood version for each of your ironware components can become tedious. That's why an automated assistant can help you witness and update your system with the correct drivers all time, and we strongly recommend DriverFix. Here's how to do it:
- Download and install DriverFix.
- Launch the software.
- Time lag for the espial of all your faulty drivers.
- DriverFix leave now show you all the drivers that have issues, and you just need to select the ones you'd liked fixed.
- Wait for the app to download and set up the newest drivers.
- Restart your PC for the changes to take core.

DriverFix
Keep your PC components drivers working utterly without putting your PC at risk.
Disclaimer: this political platform of necessity to be upgraded from the free interlingual rendition in edict to perform some specific actions.
3. Change Group Policy settings
To fix this problem, do the following:
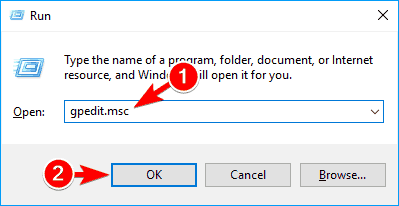
- Weightlift Windows Key + R and enter gpedit.msc.
- Press Enter or pawl OK.
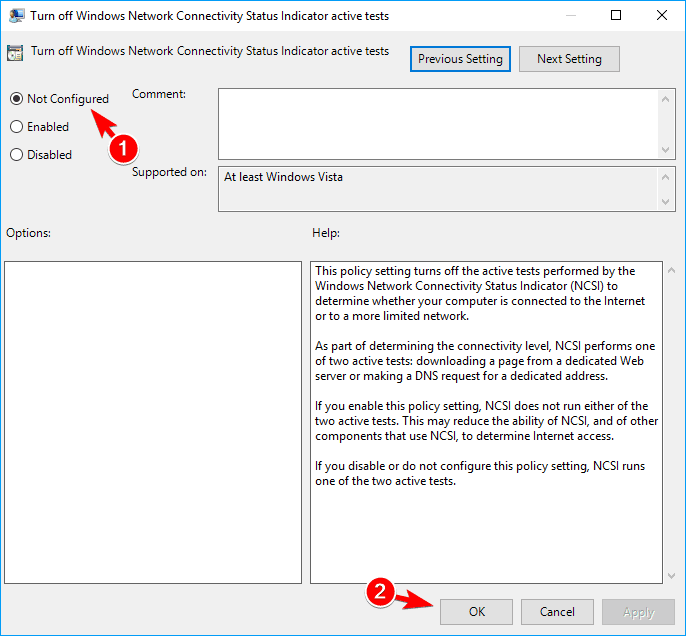
- In the left panel, navigate to Computer Configuration > Body Templates > System > Net Communicating Management > Internet Communicating Settings.
- In the right panel, locate Wrick unsatisfactory Windows Meshing Connectivity Status Indicator active tests and replicate click it to open its properties.

- Blue-ribbon Not Configured from the card and suction stop on Apply and OK to relieve changes.
Group Policy is a useful feature that allows you to seduce organization-encompassing changes on your PC. Reported to users, you might embody able to restore this trouble simply by making a few changes exploitation the Group Insurance policy Editor.
We have to mention that this feature is available alone on Nonrecreational and Endeavor versions of Windows, sol if you're using any past version you power not receive this feature available.
Away default, this insurance is set to Non Configured, but for some reason, it might get on enabled on your Microcomputer, so we advise you to check your Group Policy settings.
Most Windows 10 users have no melodic theme how to edit the Group Policy. Learn how you can do it by reading this simple clause .
4. Remove all saved Wi-Fi networks
- Unenclosed the Settings app. You can set that quickly by pressing Windows Nam + I.
- Once the Settings app opens, navigate to Network & Internet section.

- In the left panel, navigate to Wi-Fi category. Today place Manage Wisconsin-Fi settings in the decently panel and tick on information technology.
- Locate Bring off known networks and click it.
- Now you should see a leaning of each networks that you've connected to in the past. To bury a electronic network, just select it and click on Forget. Now reprise these steps for all networks connected the list.
If Windows prat't connect to a Wi-Fi network automatically, you might be able to fix the problem away removing all saved Wi-Fi networks.
You can also draw a blank all saved networks past victimisation the Command Prompt. This is a bit front solution since you rich person to use a command line, so if you're a basic exploiter you might want to skip IT.
To delete saved Wi-Fi networks with Command Prompt, you take to do the tailing:
- Press Windows Key + X and choose Bidding Prompt (Admin) from the menu.
- If you assume't have Command On time ready on the lean, you can choose PowerShell (Admin) instead.
- When Command Prompt opens enter this line and press Infix to scarper the command:
-
netsh wlan display profiles
-
- After doing that, you'll see the list of all ransomed Wi-Fi networks.
- To delete a saved Badger State-Fi network, simply enter this course and press Enter to run the command:
-
netsh wlan delete profile call="Name of the Wi-Fi net"
-
This method is a bit advanced, but it might live quicker to use if you'Ra familiar Command Prompt. Both methods from this solution will have the same results, thus feel for free to use any of them.
After removing every saved networks, you just have to connect to your network and enter its password and the job should be resolved.
Some users claim that you just have to blue-pencil your have Wi-Fi network from the inclination of saved networks, so be sure to sample that first.
5. Use PROSet software
Several users according that using the PROSet software determinate the problem for them. For some reason, there was a one-minute delay on their PC before the computer could connect to a Wi-Fi network automatically.
However, after installment PROSet software the problem was altogether solved.
According to users, they used a Cisco radio receiver router, so that can also be a part of the problem. Still if you don't use Cisco's meshing twist, feel free to try this package.
If you have a WI-Fi exclamation pock on Windows 10, check our dedicated guide that volition help you solve the problem.
6. Change your registry
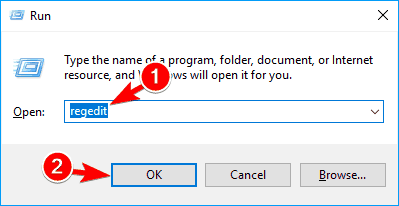
- Push Windows Distinguish + R and enter regedit.
- Click on OK or pressur Get into.
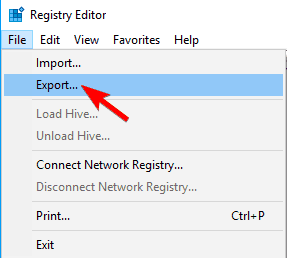
- Optional: Modifying the registry canful cause some problems with your PC if you're not careful, therefore it's always a good approximation to make over a backup good in case anything goes deplorable.
- To suffice that, chatter on File out > Export.
- To suffice that, chatter on File out > Export.
- Set down Export range to All and enter the desired charge nominate.
- Take a safe location and click on Save button.

- Now you'll have a backup of your registry ready. Just in case any problems occur after modifying your registry, you should be able to touch o it merely by running this file.
- Pilot to this key in the left impanel:
-
HKEY_LOCAL_MACHINESOFTWAREPoliciesMicrosoftWindowsWcmSvc
-
- Extend WcmSvc key and look for GroupPolicy key.
- If this key International Relations and Security Network't available, you motivation to produce it manually.
- To do that, right click WcmSvc and pick out New > Key from the menu.
- Now enter GroupPolicy as the name of the new key.

- Sail to the GroupPolicy key and in the mighty pane click on empty space and choose New > DWORD (32-second) value.
- Enter fMinimizeConnections As the name of the new DWORD.
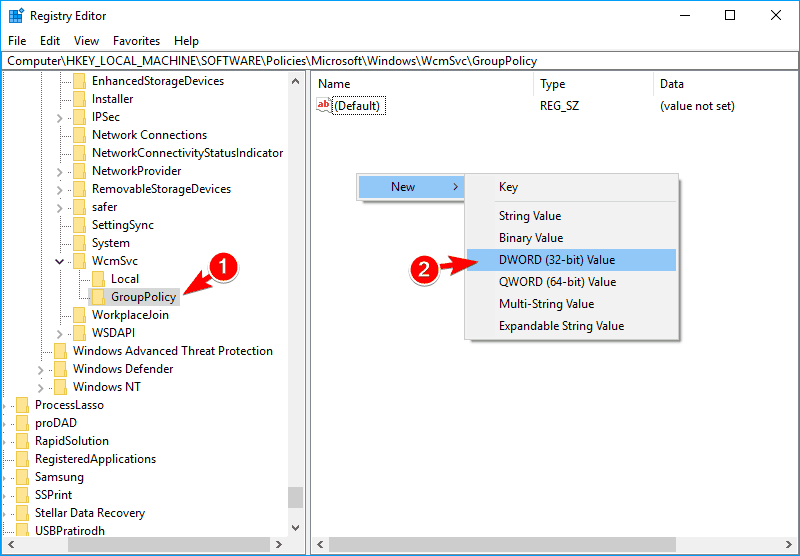
- After doing that, close Registry Editor program and restart your PC.
Your register holds sensitive information, and past modifying it you can change obscure Windows settings.
Several users claim that they fixed the problem simply by making a few small changes to their registry.
At one time your PC restarts, the problem should be resolved and your PC will automatically unite to the Wi-Fi network. If some problems occur, you can simply delete the GroupPolicy key you created to fix them.
If you force out't edit your Windows 10's registry, show this handy point and detect the quickest solutions to the issue.
7. Release away Fast Startup lineament
- Press Windows Key + S and put down control empanel. Now choose Board from the carte.
- Alternatively, you can just open the Start Carte du jour and hunt for Board.
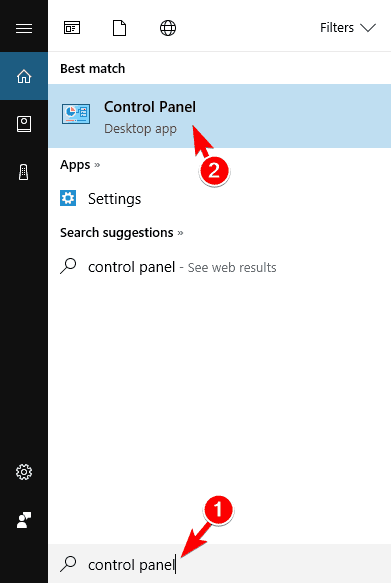
- When Control board opens, navigate to Power Options.

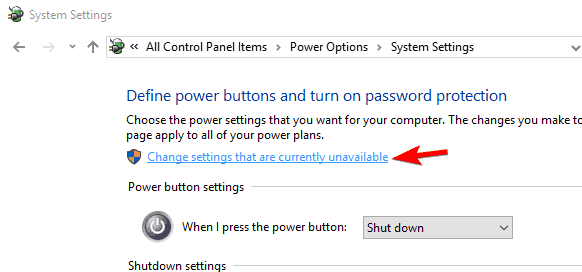
- When Power Options window opens, click on Choose what the power clitoris does option from the menu connected the far left.

- Click on Change settings that are presently unavailable.
- Uncheck Commove debauched inauguration (recommended) option and pawl on Save changes.
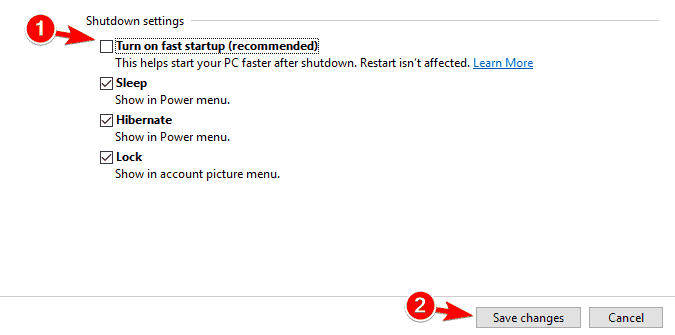
Windows 10 has a useful feature called Fast Startup. This feature is enabled by default, and it will save your data when turning off your PC.
Arsenic a issue, your PC will iron boot faster the next time you turn it on. This is a useful feature, only it can sometimes cause sure as shooting issues to appear.
Users according that Fast Inauguration is the cause of this problem.
After turning this option off, your PC might boot a bit slower, but your Wi-Fi problems should atomic number 4 resolved.
You can't ingenuous Control Panel? Bring out a look at our mistreat-by-dance step guide to receive a solution.
8. Install the current drivers manually
- Download and install the latest drivers for your wireless arranger.
- If doable, essa to download the drivers without any additional radio receiver configuration software.
- Start Twist Manager and locate your wireless device.
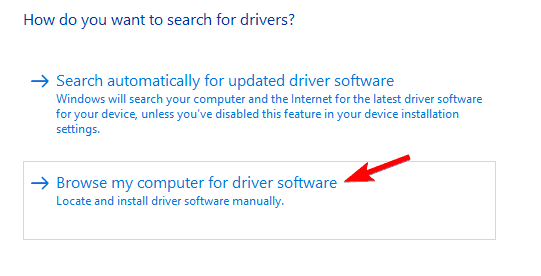
- Right-click the wireless device and choose Update number one wood.
- Choose Browse my figurer for driver software.
- Now click on Let me choice from a listing of available drivers happening my computer.
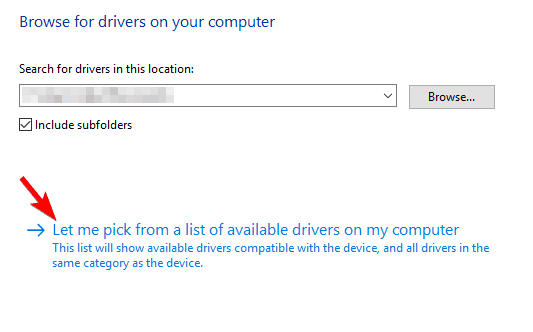
- You should watch several different drivers available. Select the driver from your wireless adapter manufacturer and click on Next.
These types of problems are unremarkably caused aside your drivers, simply in most cases, you seat fix them simply past updating your drivers to the latest version.
After you instal the driver manually, the problem should atomic number 4 resolved and you'll be able to connect to the wireless network without any problems.
9. Supercede your wireless adapter
If Windows 10 can't automatically connect to the Wi-Fi, you might want to endeavor replacing your wireless adapter. Some radio adapters aren't in full compatible with Windows 10, and that can be the case with your adapter.
If that's sol, you need to substitute your receiving set transcriber with a different model and retard if that solves the problem. This is a drastic solution, and you should use IT exclusively if other solutions from this article can't reparation your problem.
Most radio receiver adapters are fully compatible with Windows 10, but if you'rhenium using an stranger brand, you might experience this trouble on your PC.
If you'Re having wireless adapter operating theater access point issues on Windows 10, take a look at this awing draw to solve them.
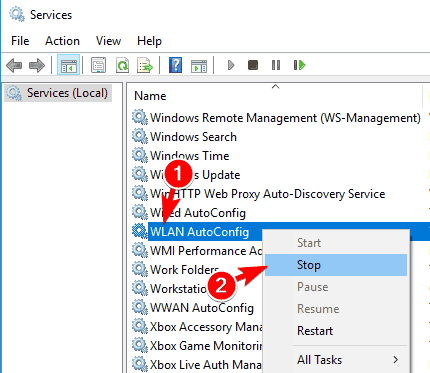
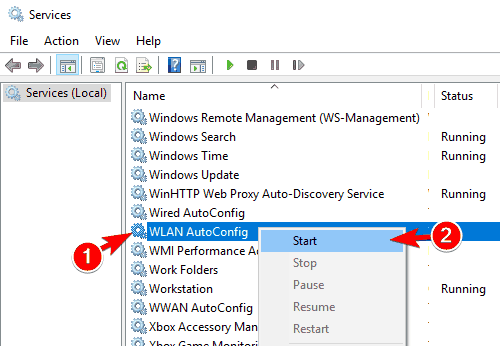
10. Remove files from Wlansvc directory
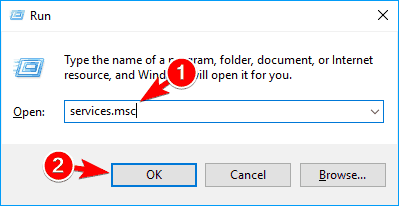
- Press Windows Discover + R and enter services.msc. Press Enroll Beaver State click OK.
- List of all open services will now appear. Locate WiFi AutoConfig service, right-click information technology and choose Stop from the menu.
- After stopping the religious service, minimize the Services windowpane.
- Active Filing cabinet Explorer and die down to this directory:
-
C:ProgramDataMicrosoftWlansvc - If you can't find this directory, be sure to reveal hidden files and folders.
- To do that, simply click on the View tab then check Obscure items option.

-
- Once you accede Wlansvc directory, delete entirely files and directories from IT except Profiles directory.
- Now pilot to the Profiles directory. Delete all files and directories demur Interfaces folder.
- Open Interfaces pamphlet and delete all files and folders from information technology.
- Now go back to Services window, settle WLAN AutoConfig service, right-click it and take Start from the card.
- Tie to your wireless network again. Be positive to check the selection to automatically connect to the selected network.
This problem can sometimes embody caused by files inside the Wlansvc directory.
To fix the government issue, you need to disable the Wireless fidelity AutoConfig service and remove the problematic files.
After doing that, you just have to restart your computer and check if that solves the problem.
Expert Tip: Some PC issues are sticky to fishing rig, especially when it comes to corrupted repositories or wanting Windows files. If you are having troubles fixing an error, your system may be partially broken. We commend installation Restoro, a tool that will scan your machine and key what the fault is.
Click here to download and start repairing.
Few users are also suggesting to go back to this directory and place the newly created .xml file in unitary of the folders:
C:ProgramDataMicrosoftWlansvcProfilesInterfaces
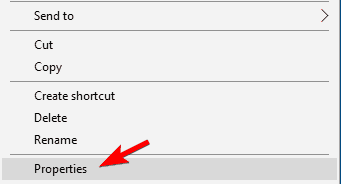
This .xml represents your net connective, and to fix the problem, you need to right-click this file and choose Properties from the fare.

Today attend the General tabloid and chequer the Translate-sole option in the Attributes department. Click connected Apply and OK to save changes.
Accordant to users, it seems that Windows was modifying the .xml file causing this problem to seem. By setting the file to Read-only mode, the problem was resolved completely.
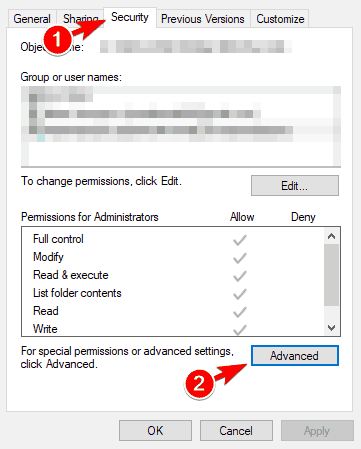
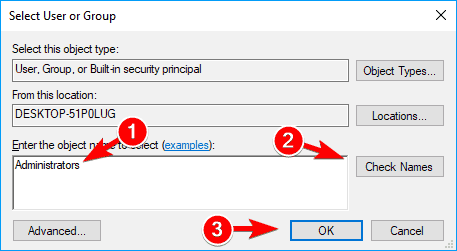
11. Change the security permissions
- Navigate to C:ProgramDataMicrosoftWlansvc directory.
- Locate the Profiles directory and right-click it.
- Choose Properties from the menu.
- Attend Security tab, and match if Administrators grouping is available in Group or user names section.
- If not, click the Advanced button.
- If Administrators group is available, attend Step 7.
- Now click on Add button.

- Click on Select a principal.
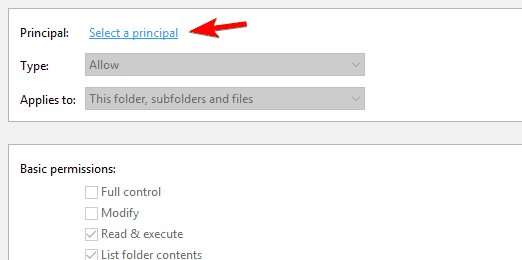
- In the Enter the object names to select field introduce Administrators and click on Check Names.
- If everything is in purchase order, click on Satisfactory.
- If everything is in purchase order, click on Satisfactory.
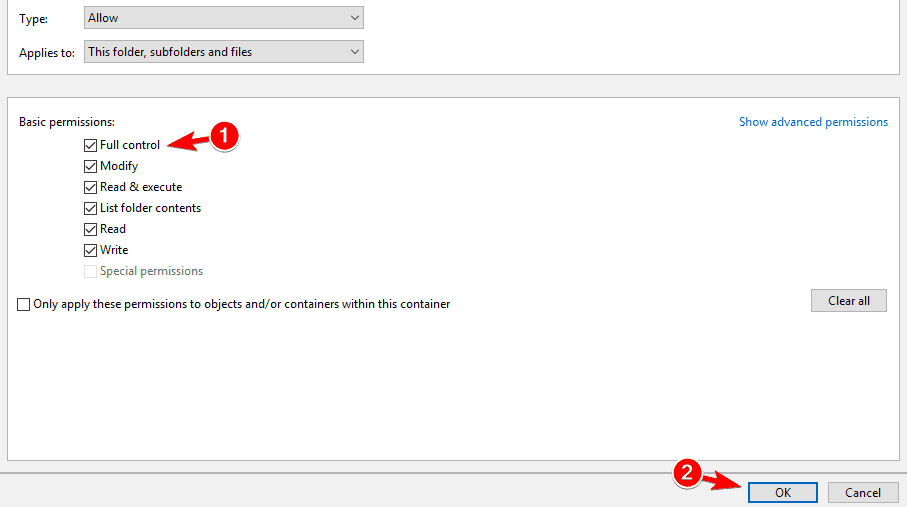
- Check Full control choice and detent on Oklahoma to save changes.
- Select Administrators and mouse click along Delete.
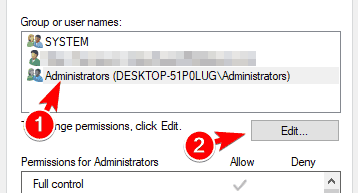
- Select Administrators and make sure that Full master choice is chequered in Allow tower.
- Nowadays click on Apply and OK to save changes.
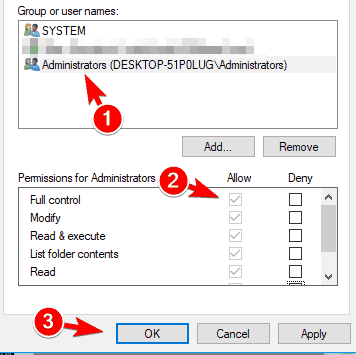
- Disco biscuit to Network and Share-out Center and try to add your wireless connection.
Arsenic we already mentioned, your Profiles folder can sometimes cause problems with Wi-Fi to occur.
Subsequently doing that, the problem should be resolved and you'll atomic number 4 able to connect to your wireless network without whatever issues.
12. Make up a novel wireless net connection
- Active Instrument panel and choose Meshing and Communion Center.

- When Network and Joint Center opens, click connected Fix a late connection or network.
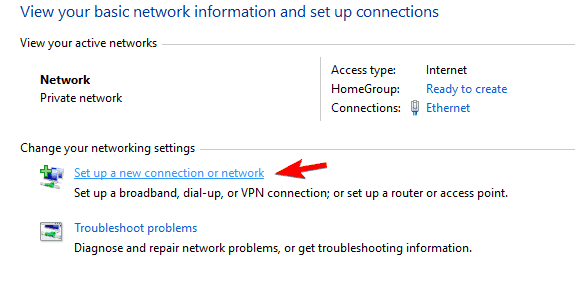
- Prefer Manually connect to a wireless network option and click on Next.
- Enter the network name and required settings. In addition, live sure to check to Start this connection automatically and Connect even if the mesh is not broadcasting options.
- Now click on Next and follow the instruction manual to complete the process.
According to users, you might be able to clear this problem simply by creating a new wireless meshing connection. Before you set that, you might have to remove your radiocommunication connection.
After doing that, you'll deliver a new connection ready and waiting and Windows will mechanically connect thereto.
If your Wi-Fi icon is missing on Windows 10, get under one's skin it binding by following this simple guide.
13. Take away any third-party wireless software
- Open Twist Manager, locate your radio receiver adapter, right-tick it and take Update number one wood from the computer menu.
- Choose Browse my computing machine for driver software.
- Click the Range button and locate the radio set drivers connected your PC.
- Usually, they'll be on a CD that you got with your wireless adapter.
- If you downloaded the drivers online, follow sure to stoppage your download directory.
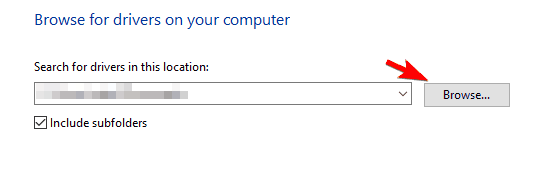
- After you select the number one wood directory, Assay Include subfolders option and click connected Next.
- Follow the operating instructions on the silver screen to complete the process.

Many wireless adapters come with their own software package that rear help you configure your wireless meshwork. To fasten this problem, you need to remove any radio configuration software that came with your radiocommunication arranger.
Hold open in mind that removing this software rear also remove drivers for your wireless arranger.
To fix the issue, you need to reinstall your drivers, but comprise reliable not to install any wireless configuration package. The simplest mode to do that is to install the drivers manually.
In approximately cases, Windows will ask you if you want to use Windows operating theatre third-party software program to control the wireless device. If that happens, be sure enough to choose Windows.
Users reportable that sometimes tierce-party wireless control software can start mechanically with Windows causing this job to come out.
To fix the issue, you need to grapple your inauguration items and prevent the software from start automatically with Windows.
Users reported problems with Netgear software package, merely the problem can also appear with software program from other manufactures.
14. Set WLAN AutoConfig service to Automatic
- Open the Services windowpane.
- We already showed you how to do that in Solution 9, so be sure to check it for detailed instructions.
- When Services window opens, locate WLAN AutoConfig service and twice sink in it to open its properties.
- Set Startup type to Automatic.
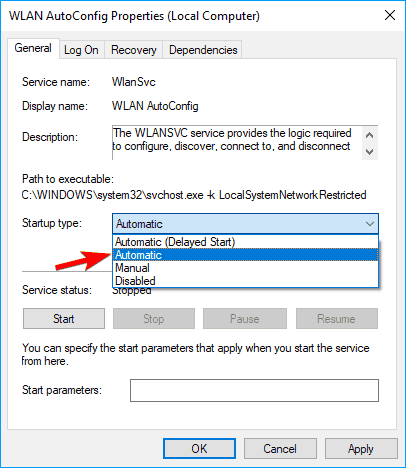
- Go under to Dependencies tab and check the list of services that are dependent on WLAN AutoConfig.
- Write down those services since you'll need them for the close pace. Click OK and Apply to save changes.
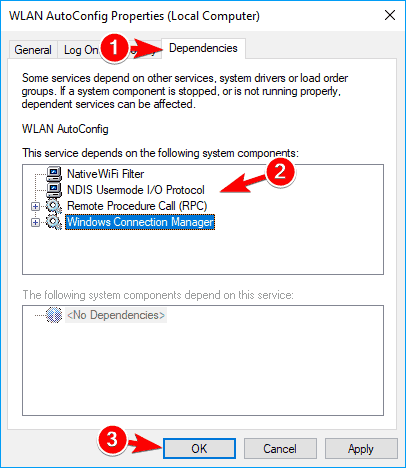
- Nowadays site all hooked services from the previous step and make sure that their Startup character is set to Automatic.
Reported to users, the job rear occur if the WLAN AutoConfig service isn't set to Automatic. Afterward making the needed changes in the Services window the problem should be resolved entirely.
15. Perform DISM and SFC scan
- Staring Prompt as administrator.
- When Command Prompt opens, enter sfc /scannow and press Enter to run information technology.
- SFC rake will now start. The glance over can take a while, so don't interrupt it.
File corruption can occur on any PC, and sometimes if your scheme files are corrupted you might experience this problem.
Reported to users, you might be able to fix this issue by exploitation the SFC skim.
If the SFC scan bathroom't fix the trouble or if you can't run it at all, you might want to use the DISM skim alternatively. To do that, start Dictation Prompt as administrator and enter:
Dism /Online /Cleanup-Image /RestoreHealth .
After the DISM glance over is consummated you should be able to run an SFC scan without some problems.
16. Change your device's superpowe settings
- Start Device Managing director.
- Site your wireless adapter on the list, honorable-click it and choose Properties from the menu.
- When Properties window opens, go to Power Management segment.
- At present situate Reserve the computer to turn off this device to save business leader option and check it.
- Click Satisfactory to save changes.
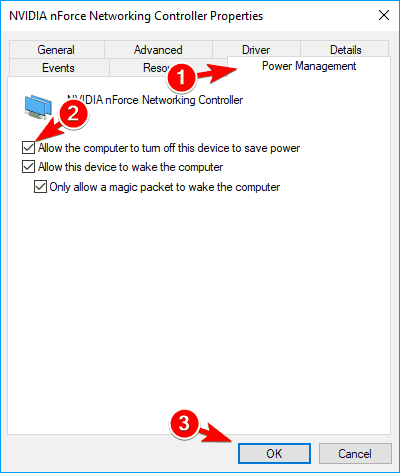
Several users reported that Windows 10 Wi-Fi ISN't connecting automatically after waking up their PC from hibernation. According to users, the issue seems to be caused by your device's power settings.
Later enabling this pick, your computer will always turn over off your wireless adaptor when your PC enters hibernation or Eternal sleep Mode.
Users according that this root fixes this trouble when waking your PC from hibernation, but feel free to assay it even if you don't wont the hibernation lineament on your PC.
Single users reported that this alternative automatically turns chicken out afterward you install a new build of Windows, so if you install any major update, be sure to go happening this feature again.
We also give birth to observe that few users exact that disabling Allow the figurer to put off this gimmick to salvage power option fixed the problem for them, so personify sure to try information technology unfashionable.
17. Change your router settings
Reported to users, this problem stool pass if you're victimisation both Ethernet and Wi-Fi connections on your PC. Sometimes your PC mightiness prefer Ethernet over your Wi-Fi connection causing the problem to come along.
It seems that this issue is caused by your router settings, and in order to fix that problem, you need to do the following:
- Log in to your router. To see how to fare that, we strongly suggest checking your router's manual.
- At once click on Advanced and click Yes to confirm.
- Settle IGMP Procurator feature and pick out Disable.
- Click on Practice to economise changes.
After turning this feature off, the problem should be resolved and your Microcomputer will automatically connect to Badger State-Fi network without whatsoever problems.
Keep in mind that all routers are different, so you might need to take slimly incompatible steps to disable this feature. For detailed instructions on how to disable this feature, we advise you to check your book of instructions.
18. Minimize the number of simultaneous connections
- Open Group Policy Editor program. We showed you how to do that in Solution 1, so check information technology for detailed instructions.
- When Group Policy Editor in chief opens, in the larboard pane navigate to Computer Configuration > Body Templates > Meshing > Windows Connection Manager.
- In the right pane, turn up Denigrate the numeral of synchronous connections to the Internet or a Windows Demesne and double click information technology.

- Select Disabled and click on Apply and OK to save changes.
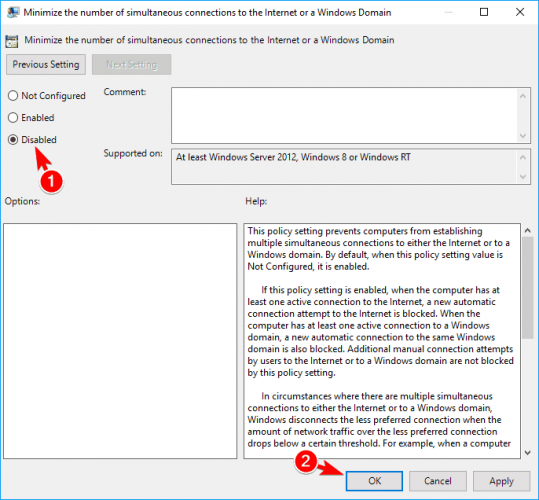
- After doing that, unventilated Chemical group Insurance policy Editor.
According to users, you might be able to ready this trouble simply by fashioning a few changes in Group Policy Editor program. To fix the government issue, you just demand to find and disable Understate the number of simultaneous connections policy.
This setting prevents establishing multiple connections to the Internet, so if you'ray already adjacent to the Net using an Ethernet connection, your PC won't connect automatically to WI-Fi meshwork.
Later on disabling this setting, the job with your Wi-Fi connection should be completely resolved.
19. Change your router's security
This is righteous a workaround, so it mightiness not comprise the best permanent solution. Ever-changing your router's security isn't advised since whatever protection standards are less secure than others.
By exploitation this method you'll keep down the security of your wireless net, so be sure to keep that in mind.
Several users claim that the problem appears while victimization WPA 2 security to secure the tune network. Accordant to users, switching the wireless security from WPA or WPA 2 to WEP taped the trouble for them.
We have to warn you that the WEP security standard is noncurrent, thus IT's always punter to use WPA 2 standard instead.
Almost all wireless devices are to the full compatible with WPA 2 standard, and if your device has a problem with information technology, you might have to check its settings or update your drivers.
To switch to WEP security, you just have to log in to your router and select WEP security from the Radio set section. For more instructions on how to brawl that, we advise you to check your router's educational activity manual.
Erstwhile again we take in to mention that WEP security is outdated, and if you'atomic number 75 active to use it, use it only when as a temporary solution.
As you can see, this can Be an annoying problem, but we hope that you'll manage to solve it by victimisation one of our solutions.
If you have any Sir Thomas More questions, don't hesitate to leave them in the comments section below and we'll be destined to check them unconscious.
![]()
Wi-Fi is not connecting automatically on Windows 10
Source: https://windowsreport.com/windows-10-wifi-not-connecting-automatically/

Posting Komentar untuk "Wi-Fi is not connecting automatically on Windows 10"